


Lash Lift Tips & Tricks in 2025
Lash lifts are one of the most in-demand beauty treatments right now, enhancing clients’ beauty in a long-lasting and natural-looking way. The treatment lets you roll out of bed and look glorious from the get-go – without the maintenance that lash extensions require.
It’s a difficult treatment to master though, which is why we’ve put together our ultimate list of expert lash lift tips and tricks to help you achieve a beautiful lash lift every time.
Flawless Tip: How to enhance lash lift treatments?
With the versatility of our Silicone Lash Lift Shields, you can confidently use them on any client and achieve a consistently dramatic look and curl every time.
What is a lash lift?
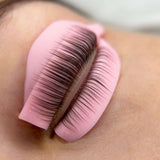
Also known as LVL lashes, a lash lift is a semi-permanent beauty treatment that lifts and curls the lash, making lashes look longer and fuller without the need for extensions. Most people’s lashes grow out rather than up, but lifting them into a more upward position accentuates a person’s beauty and gives them a wide-eyed, more feminine look.
Please note, we do not recommend at-home lash lifts as the treatment is dangerous to attempt if not done by a trained beauty professional.
Top 6 Lash Tips & Tricks
The lash lifting procedure requires precision and expertise. By taking our Flawless Lash & Brow Lift Online Training course, you’ll master all the ins and outs of lash lifts and brow lamination. But we’re here today to share a few of our favorite lash lift tips and tricks, just to make lash artists’ lives that little bit easier.
1. Ensure the eye area is clean
Before you begin the treatment, we recommend ensuring that the skin around the client’s eyes and brows is as clean and as oil-free as it can be. This is to make sure that the lash rod stays put - if the skin is oily it can slide about and compromise the effectiveness of your lash lift.
Starting with a clean canvas also allows the various lotions used to work more efficiently.
2. Master the different lash lift styles
Know your stuff. Make sure you’re aware of the different styles and shapes that your clients may ask for. Ask what your client is looking for, but be prepared to steer them towards what best suits their eye shape, which may not be the same.

Here are a few of the most popular styles of lash lifts to be aware of:
Vertical Placement: This is where the lashes are lifted upright, helping your client’s eyes look more bright and more open. This style is a good starting point for beginners and suits most eye shapes including small eyes and downturned eyes.
Open Eye Placement: This style makes eyes appear bigger. Rather than being styled to go purely straight up, the lashes are applied on the shield to straight up at the centre point of the eye, then gently go out a little towards the outer corner.
Cat Eye Placement: This effect usually lengthens eyes, adding that little bit more drama to a look. The lashes are fixed upward and tilt to the outer eye, to a greater extent than the cat eye lift shape.
Kitten Eye Placement: This look is suited to people with prominent eyes. The lashes lean toward the outer eye corner creating a more elongated and sultry look. This may narrow eyes too, so don’t apply to clients with hooded, deep-set or almond-shaped eyes as this may not be the best style to heighten their beauty.
3. Don’t over-glue it
Apply the minimum amount of adhesive that you need. This will save you from any inconveniences in the long run, such as clumpiness and having to try and clean the excess off later down the line. It also helps the product last longer - and we all love saving money!
4. Get to grips with timings
You can’t rush perfection. Make sure you’re letting the product rest on the lashes for the optimum amount of time, depending on the length and thickness of the lashes.
For example, if the client’s eyelashes are thick, you can apply Lotion 1 for the full 14 minutes, whereas if they’re on the thinner side, leave them on for up to 9 minutes. For Lotion 2, leave on for 6-9 minutes depending on the length and thickness of the eyelashes or a full 10 minutes development time maximum for very strong hairs.
Leave on for too long and you will over-process the lashes, and may even damage them. Leave on for not long enough, and you’ll achieve a poor lift.
5. Choose versatile products
Choose a lash-lift lotion brand that can be used for brow lamination as well as lash lifts, so you get more bang for your buck! This will save you time and money in the long run, meaning you don’t have to fork out for twice the product, and keeping the product that you do have, fresh, because you will use it up more quickly.
6. Tinting as well? Try Keratin Tint
Last, and certainly not least, is our ingenious and unique Keratin Tint - a pro lash artist’s secret weapon! Your clients will often want a lash tint along with their lash lift, and there’s no better way to do this than with our Keratin Tint Treatment.
This 3 in 1 cream is an eyelash tint, making the lashes darker and appear more defined, whilst adding the necessary developer and also nourishing and conditioning your clients’ lashes - saving artists both time and money.
Lash lift aftercare tips
- Make sure your client keeps their eyes dry for 24 hours after treatment. That means staying away from rom coms!
- Don’t let eyelashes get wet in the shower during this period, either.
- Recommend your client use only oil-free makeup afterwards.
- No mascara or makeup remover for up to 48 hours after treatment.
- Keep the eyelashes conditioned afterwards to maintain flawless results.
Get to know more about lash aftercare tips and instructions.
Flawless products for lash lifting
The best products for a perfect lash lift finish:
- Lash and Brow Lotion No1 - opens lash cuticles so that artists can change the hair growth direction
- Lash and Brow Lotion No2 - helps fix the lashes into the desired shape
- Lash and Brow Lotion No3 - cleanses and nourishes the lashes, giving them a shiny, sleek look when the treatment is over.
- Lash Plump - our nourishing treatment, adding shine and strength and helping the lash lift last longer
- Flawless Keratin Tint Treatment - our ingenious product that combines tint, oxidant to develop the tint, and lash plump to feed the lashes with keratin and vitamins all in one easy to use bottle. Not only does this save you from having to buy and apply the three products separately, the lash tint will last longer when the lashes have been nourished with keratin vs simply using regular tint and oxidant.
So there you have our ultimate list of tips! The lash lift process can seem daunting at first, but when you have the right knowledge and the right products, you’ll achieve a stunning lash lift every time that will keep your clients coming back.
3 comments


Great post. Thanks for sharing. You can also checkout our course here – https://bcbeautytraining.co.uk/course/microdermabrasion-course
“I’ve been considering getting my eyelashes lifted, and this article has definitely convinced me! It’s great to know that the process is painless and the results can last for weeks.”
Hi… This article is helpful and full of information about lash lifts. I was thinking of getting lash lift treatment in Vancouver at EM’s Esthetics which my friend suggested. Now, I am confident to take this treatment after reading your blog. Thank you for sharing it.